Thursday, September 17, 2009


Install Windows XP


Published: September 7, 2006


Most new computers come with Windows XP installed, so many people never have to install it. However, you may need to install Windows XP if:


You replaced your hard disk drive with a new hard disk drive that does not have Windows XP installed.


You are reinstalling Windows XP on a computer because you want to clean off your hard drive and remove any unwanted programs, such as spyware.


You purchased a computer without an operating system.


Fortunately, you do not need to be a computer expert to install Windows XP. Installing Windows XP is a straightforward process that takes between one to two hours. Of that time, you need to be present for only about 30 minutes.


Pre-installation checklist


Install Windows XP


Note: If you have a computer with an older operating system, such as Windows 98, Windows ME, or Windows 2000, you should upgrade to Windows XP instead of performing a clean installation.


Pre-installation checklist


Before you begin the installation process, use this checklist to make sure that you are prepared:

Check


You have the Windows XP CD.

Check


You have the product key available. The product key is located on your Windows XP CD case and is required to install and activate Windows XP.

Check


Your computer hardware is set up. At a minimum, you should connect your keyboard, mouse, monitor, and CD drive. If available, you should connect your computer to a wired network.

Check


You have Windows XP drivers available. Drivers are software that Windows XP uses to communicate with your computer’s hardware. Most new computers include a CD containing drivers. If you do not have drivers available, Windows XP may already include drivers for your hardware. If not, you should be able to download them from your hardware manufacturer’s Web site after you set up Windows XP.

Check


If you are reinstalling Windows XP on an existing computer, you need a backup copy of your files and settings. The installation process will delete all of your files. You can use the File and Settings Transfer Wizard to store your files and settings on removable media and then restore them after installation is complete.


Installation process


Installing Windows XP can take up to two hours. To make the process more manageable, it has been broken up into several sections. When you are ready, install Windows XP:


Part 1: Begin the installation
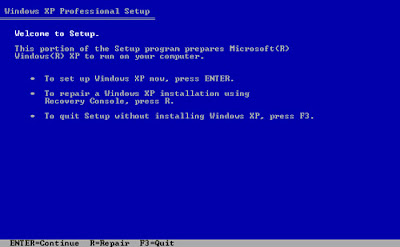


1.


Insert the Windows XP CD into your computer and restart your computer.


2.


If prompted to start from the CD, press SPACEBAR. If you miss the prompt (it only appears for a few seconds), restart your computer to try again.


3. Windows XP Setup begins. During this portion of setup, your mouse will not work, so you must use the keyboard. On the Welcome to Setup page, press ENTER.

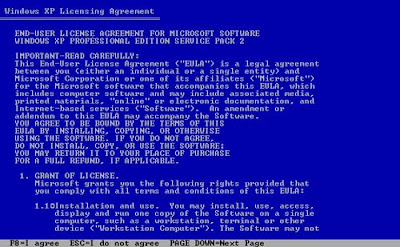
4. On the Windows XP Licensing Agreement page, read the licensing agreement. Press the PAGE DOWN key to scroll to the bottom of the agreement. Then press F8.


Installation Process of Linux

Linux Installation, Step by Step

If you have come directly to this page hoping to install Linux without doing any more reading, I suggest that you reconsider. Without the proper knowledge and preparation, attempting to install any operating system (whether Linux or any other) can be a disaster. So before I launch into the resources for your step by step Linux installation, here are some things you should already have read:

Before You Begin... I have created a backgrounder for new users in the form of several brief articles that cover the bare necessities of technical skills required to install Linux. You should read through the articles before you install, and make sure you understand all the concepts involved. The articles also cover in detail the several preparatory steps required before you install, which are often missing from other documentation.

Each Linux installation has its own setup utility, every one vastly different from all the others. This makes it very difficult if not impossible to write a step by step Linux installation manual. The closest thing in existence is the Linux Installation and Getting Started Guide, which should be included in HTML format with every Linux distribution, and is available online thanks to the Linux Documentation Project. This book contains a fairly good comparison of the major distributions and an outline of the installation process for each one. It also covers the basic technical concepts you need to understand during installation, and covers some issues of usability following your install. I highly recommend that new users at least skim through this book, and preferably absorb every word.

Also well worth the time it takes to read it is the Linux Installation HOW-TO. This document will give you some invaluable background knowledge about what is involved in the installation process.

Now that you are armed with the knowledge you need, it is time to present you with your map to Linux. Below are links to the official installation documentation for the various Linux distributions. I had originally intended to add my own reviews, comments and tips to this documentation, but with each vendor releasing two new versions every year, I just can't keep up.

Ubuntu Linux

Ubuntu Documentation page

Debian GNU/Linux

Installation Manual - Also the Online Support Page lists mailing lists and chat channels.

Mandriva Linux

Mandriva Documentation Page gives access to install guides for all recent versions of Mandriva in multiple languages. Wow!

Red Hat Linux

Red Hat Linux Manuals Page includes install guides for all recent versions of Red Hat Linux.

Slackware Linux